LOGO! Help with understanding the tool for an assessment.

TOMENGLAND

Member
Join Date
Mar 2024
Location
South Yorkshire
Posts
5
Hello Team, I am desperate for some help with an assessment I have as part of a Level 3 general engineering course. I am in a role that is much more mechanically based so struggling with this PLC segment and wondered if someone could help me.

The question is as follows:

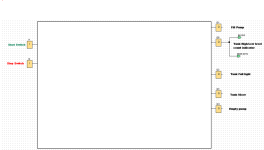
The application above illustrates a simple stirring application in a lemonade factory.

Use LOGO to design and build the above system, using function block or ladder logic, which will control the operation as follows:

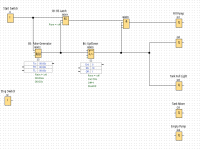
When the Start ‘push to make’ (not toggle) switch (I1) is pressed/released, and gets latched on (B1: RS latch), the start ‘fill’ pump (Q1) will be energized and the tank will start to fill.

The pulses generated by flow meter 1 (B5: pulse generator) should be used to increment the counter (B6: Up/down). Tank level full is when the counter function on = 10 and tank low level is when counter off = 1. These values can be used as feedback to control the pumps (instead of the high/low level sensors shown above) and can be called the ‘tank high/low level count indicator’ (Q5 or use a flag M1)

When the full liquid level in the tank is sensed by the tank high/low level count indicator (Q5), the fill pump will be shut-off and the FULL light (Q2) on the control panel is to be energized.

When the tank is full, start the mixer (Q3) and run for 10 seconds (B8: off-delay timer).

When the 10 seconds has expired, stop the mixer (Q3) and start ‘empty’ pump P3 (Q4).

Pump 3 (Q4) will be required to run until the tank is empty.

The pulses generated by flow meter 3 (B15) should be used to decrement the counter (B6: Up/down). Tank empty can be detected by the high/low level count indicator (Q5 or use a flag M1) to switch off the pump

When the stop button (I2) is operated, the process must stop immediately (Q1, Q3, Q4).

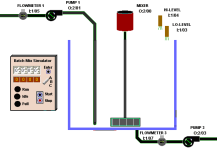
Test your LOGO build and comment on your testing using LOGO simulation mode. This requires at least 3 print-screens of testing the system using the LOGO simulator below at the filling, mixing and emptying stages. Clearly snip/print-screen and explain your build and test work. Use input/output (I/Q) numbers shown. Function numbers (B) can be your own choice, and you are also likely to need some basic logic functions (e.g. And/Or/Not) for the various conditions given in 3a.

Any help would be massively appreciated as I am so stuck on where to go with this, if anyone can help with screenshots, files etc. if needed I can provide my email through private message.

Thank you
 

Attachments

  • stiring application.png
    stiring application.png
    20.1 KB · Views: 10
  • ex.png
    ex.png
    89 KB · Views: 10
This forum will assist students with homework assignments. However, the forum members (some of us with great difficulty;)) try to not do the work for students. Because someday in the future we or someone might be in a plant where those former students, having passed the course or gained certification, have programmed the logic for dangerous equipment, and we would prefer the comfort of knowing they actually understood what they were doing. There is no ethical shortcut to learning.

With that out of the way, the hardest parts of this type of specification are the following:
  • Converting the words of the specification to logic statements. Once this is done, however, the programming is mostly straightforward.
  • Interpreting inconsistencies in the problem. For example, once the tank has completed the cycle of filling, stirring (mixing) and draining, should that finish all operations, or should the transition to a low level initiate another cycle starting with filling again?
Finally, to speak (program) in a language, we need to understand vocabulary words (operations) available*. And the best way to learn with a language like LOGO! is hands on. The problem description mentions a few complex function blocks: counter; off-delay timer; etc. Look at the image below, and duplicate it in LOGO!; note that I1, I5, and I6 are configured as "Momentary pushbutton (make)" inputs (double-click on the input block; click on the Simulation tab of the popup; click the "Momentary ... (make)" radio button).

Now put that program into Simulation mode**, start pressing the inputs, see how the function blocks respond, and build a model in your head of what those functions do. That is how you build the vocabulary of a programming language.

* We also need syntax, but let's start with vocabulary for now.
** press F3, or click the SIM button in the Diagram Editor menu bar
 
This is all I have been sent, all the information I have shared is all I have and that's why I asked for help. Any kind of screenshots so then I can use the information to cross reference and understand the answer. Not just to copy.
 
This is all I have been sent, all the information I have shared is all I have and that's why I asked for help. Any kind of screenshots so then I can use the information to cross reference and understand the answer. Not just to copy.
Whoops, I forgot the image! Here it is:

Untitled.png
 
Almost all PLC programs model some part of the real world. The key design choice is the level of fidelity of the model. In this case, the program has two inputs: the start button; the stop button. There are also three other inputs; the low and high level indicators; the flowmeter pulses. However, for the purposes of this exercise those will be simulated within the program.

Level simulation

The level in the tank can be conceptually modeled very simply: if the 'fill' pump (Q1) is on, then the level rises at some rate over time; if the 'empty' pump (Q4) is on, then the level drops at some rate over time; if neither pump is on, then the level remains constant over time; if both pumps are on, ... well, let's code this so that does not happen.

Also, when the level rises to the high level switch, the high level input becomes 1; when the level reaches the low level switch, the low level input becomes 1.

For the purposes of the operational model (see below), we only care about two events:
  • when the level is rising and triggers the high level switch, because that is when we stop the filling pump and start the mixer and mixer timer, and
  • when the level is falling and triggers the low level switch, because that is when we stop the emptying pump.
Normally, with the two level switches, we might implement that behavior like this:

Untitled.png

Note that, the High level switch and the Low level switch cannot both be 1 at the same time*, so this circuit implements hysteresis in time, where
  • the output is 0 at and below the low level limit,
  • the output is 1 at and above the high level limit, and
  • the output maintains (latches) its previous (in time) output state when the level is between the high and low level limits.
* Assuming both are operating correctly; writing code to protect the physical system against anomalous behavior (bad inputs) is another thread entirely

However, for this assignment we can use an Up/Down counter to model that tank level behavior. The Up/Down counter has three discrete input pins, three input parameters, and one output pin:

01.png

  • A True input on the R pin will reset the count to 0'
  • A rising edge (False to True transition) input on the Cnt pin will cause the counter to either increment (count up) or decrement (count down) its accumulator;
  • A False or True input on the Dir pin make the counter increment or decrement, respectively, for each rising edge on the Cnt pin.
  • The On parameter is the rising accumulator value at which the output pin (on the right) changes from False to True
  • The Off parameter is the falling accumulator value below which the output pin changes from True back to False.
So the trick to simulating the level with the Up/Down counter is to have it count up when the 'fill' pump is on (Q1 is 1) and to have it count down when the 'empty' pump is on (Q4 is 1). That requires some additional logic:
  • Configure and Up/Down Counter, to model the tank level logic, with parameters: On = 10; Off = 0.
    • When the simulated "level" is at 0, the counter output will be 0
    • When the simulated "level" rises from 0 to 9, the counter output will remain at 0
    • When the simulated "level" rises from 9 to 10, the counter output will change to 1
    • When the simulated "level" drops from 10 to 1, the counter output will remain at 1
    • When the simulated "level" drops from 1 to 0, the counter output will change to 0
    • If you don't understand this, build the Up/Down Counter circuit using two inputs per the image in my previous post, then
      • manually toggle the inputs in Simulation mode, and
        • observe the behavior of the Up/Down Counter.
  • Connect the output of Q4 to the Dir input pin (Direction) of that Up/Down Counter
    • When Q1 ('fill' pump) is 1, Q4 will be 0, the input pin will be False, and the counter will count up at each pulse
    • When Q4 ('empty' pump) is 1, then the input pin will be True and the counter will count down at each pulse
  • Connect the output of a pulse generator to the Cnt input pin (Count) of the Up/Down Counter
  • Configure that pulse generator to generate 50% duty cycle, 1Hz pulses (TH = TL = 0s50cs)
  • Connect the output of an OR block to the En input pin (Enable) of that Asynchronous Pulse Generator
  • Connect the Q1 and Q4 outputs to that OR block to detect when either pump is running
Operational Model

Let's break down the assignment description into boolean statements.
  • if the start button is pressed and the system is not running, then set the system into run mode
    • Almost everything after this assumes the system is in run mode,
      • so assume the is a "system is in run mode AND" clause at the start of each IF statement
  • if the "level" (Up/Down Counter, above) output is 0, then run the 'fill' pump (Q1)
    • This will trigger the pulse generate to start triggering the the counter to increment,
      • until it reaches 10,
        • at which point the "level" output will become 1,
          • which will stop the pump.
  • if the "level" output transitions from 0 to 1, trigger an Off-Delay timer for 10s
    • "Transitions" means use the AND (Edge) block
    • Note that that Off-Delay Timer output will be 1 for the full 10s, and then be 0
  • If the Off-Delay Timer output is 1, then run the mixer
    • Note that, when the Off-Delay Timer expires after 10s, then the output will be 0,
      • which will stop the Mixer
  • If the "level" output is 1, and the Off-Delay Timer output is 0, then run the 'empty' pump (Q4)
    • This will trigger the pulse generator to start triggering the counter to decrement,
      • until it reaches 0,
        • at which point the "level" output will become 0,
          • which will stop the pump
  • If the stop button is pressed, everything stops
So the whole thing breaks down to six logic statements. All that remains is to connect the available blocks (AND, OR, AND (Edge), Up/Down Counter, etc.) to implement that logic.
 
The point of all that is that we made, and now have, a model, which implements the behavior of the assignment description, using the available "vocabulary" (function blocks) of the chosen language (in this case, LOGO! FBD). To be fair, I probably put that together in the opposite order i.e. determined the transition points (start => fill; full => time/mix; timer expiry => empty) forst, and added details like simulating the level using the counter later.

This is in principle no different from using the maximum expected level in a tank, and the density of the fluid, to calculate how thick the tank walls need to be. We break the problem down into smaller pieces, and solve the smaller pieces. You actually did well to have those diagrams, because they defined the inputs and outputs of the model, which puts constraints on the model and keeps us from being distracted by a lot of irrelevant fluff (e.g. what color are the operator's socks? I don't care because there is no input or output for that).

P.S. don't forget that you also have a few indicator lights to program as well, N.B. you can't use the level-simulating counter output for the "full" indicator light (Q2; because the level/counter output will remain at a value of 1 from level 10 [full] down through 9 [not full] to level 1), but what else is available to
 
From the image I have been given and the screenshot you have provided it doesn't seem correct. Also on the example you shared not everything is connected i.e where my assignment says use and/not/or.

This is why I asked for help, it seems it is difficult for not only me to understand.
 

Attachments

  • ex.png
    ex.png
    89 KB · Views: 5
From the image I have been given and the screenshot you have provided it doesn't seem correct. Also on the example you shared not everything is connected i.e where my assignment says use and/not/or.

This is why I asked for help, it seems it is difficult for not only me to understand.
Learning is a process. To understand a complex concept, it is best to start with the discrete simple concepts that compose the complex.

The purpose of that screenshot was for you to understand how each of those discrete simple functions blocks operate, what its inputs, outputs, and parameters mean, and how it behaves as the inputs change.

The several pieces of logic in that screenshot are not connected because it is easier to build that understanding by looking at each block in isolation. Then, once you have a mental model of the function blocks, you can combine those blocks to build a model of the process, and also build a model of the control system for that process.

For example, consider the Up/Down Counter at the top of the screenshot:

Untitled.png

That has several pieces:
  • Input pins on the left:
    • R (Reset; discrete; not connected in this image)
    • Cnt (Count trigger; discrete; connected to I1 as a Momentary pushbutton (make))
    • Dir (Direction of count; discrete; connected to I2 as a Switch)
    • Par (Parameters supplied by an external source; not connected in this image)
  • Parameters
    • Cnt (current count value; usually increments or decrements when I1 is pressed)
    • On (Upper preset; value is 10 here; Output is True when Cnt parameter is greater than or equal to this value)
    • Off (Lower preset; value is 2 here; Output is False when Cnt parameter is less than this value)
  • Output pin on the right
    • This value is True when the Cnt parameter value is 10 (On) or greater
    • This value is False when the Cnt parameter value is less than 2 (Off)
    • This value does not change when the Cnt parameter values is between 2 (Off) and 10 (On), inclusive
The point of understanding the Up/Down Counter is to use it to model the level in the tank.
  • The LOGO! program will control the Q1pump
    • The level in the tank increases when the Q1'fill' pump is running,
      • and the level in the tank decreases when the Q4 'empty' pump is running
    • The LOGO! program can connect its pump output Q1 to an Asynchronous Pulse Generator En (Enable) input pin,
      • and connect the output of that pulse generator to the Cnt (Count trigger) input pin of an Up/Down Counter
      • So whenever the program assigns a value of True to Q1,
      • the Up/Down Counter will "see" incoming pulses,
      • and increment the value of the Cnt (current count value) parameter,
      • and it is that Cnt parameter that modles, i.e. is an analogue for, the tank level,
      • Likewise, the Q4'empty' pump output can be used to decrement the Cnt parameter,
        • which models the level when the 'empty' pump is running
      • Finally, the Output pin will be an analoguefor the state of the level switches
        • When Q1is True ('fill' pump is running) and the Cnt parameter increments to 10,
          • which models the tank level rising to the high limit switch,
          • the Up/Down Counter Output will transition from False to True,
          • which can be used to switch off the Q1 'fill' pump,
          • and to start the mixer and the timer
        • When Q4is True ('empty' pump is running) and the Cnt parameter decrements to 0 (Assuming Off parameter is 1),
          • which models the tank level dropping to the low limit switch,
          • the Up/Down Counter Output will transition from True to False,
          • which can be used to switch off the Q4 'empty' pump
I have left some details for you to figure out, for example
  • How do the Q1 and Q4 outputs generate input pulses to the Up/Down Counter?
  • How can both Q1 and Q4 drive the same Cnt pin of the Up/Down Counter?
  • How does Q1 increment the counter, and Q4 decrement the counter?
One way to make progress would be to start with an empty program, and
  • Add I1, I2, Q1, Q2, an Asynchronous Pulse Generator, and an Up/Down Counter
  • Connect I1 to Q1
  • Connect I2 to Q4
    • Note that I1 abd I2 here are not the Start and Stop buttons of the full problem,
    • but instead represent the logic of the full program that controls Q1 and Q4,
    • and all you are trying to do here is solve one discrete part of the full problem.
  • Connect these and other blocks (AND, OR, etc.) to get the Cnt parameter ("level") of the Up/Down Counter to increment when I1 is pressed, and to decrement when I2 is pressed.
 

Similar Topics

Hi all, First, thank you for reading the thread. So I had a task as the following: An up-counter must be programmed as part of a batch-counting...
Replies
7
Views
287
Hi all, I'm having a bit of difficulty when it comes to the final question of my assignment, and wondered if anybody could shine some light on it...
Replies
6
Views
1,155
Hi i have recently been studying PLC for work and i have had a task now which i believe i am close to finishing but i cannot think how to correct...
Replies
18
Views
6,400
Hi All, first post on here looking for help, the site has been a treasure chest full of useful stuff so far during my course work, so thanks a...
Replies
5
Views
2,693
Hello All, I am using Siemens LOGO!Soft V8 to write a program and am unsure of where the function is fo the CTU as seen in the attached picture...
Replies
6
Views
2,352
Back
Top Bottom